I bought the Creative Grids Kites Plus ruler because I liked its versatility - I could cut triangles and hexagons and kites. I was rather disappointed in the lack of interesting patterns I found online for it. Still, I found the ruler endlessly intriguing. I designed Shattered Kites, then Stained Kites. While working on the latter's backing I hit upon the basic block design used for
Sunrise and
Bouncing Boxes.
Showing posts with label How-to. Show all posts
Wednesday, June 22, 2022
Half-Kite Wonky Squares
Monday, May 23, 2022
Oru Kayak Seam Channel Repair
My sister and I have the original Bay St Oru kayaks. The piece that
attaches the seam channel to the hull snapped on my sister's kayak last
summer. I can see mine is starting to wear in the same spot. She contacted Oru several times, but was unable to get a
replacement part (she offered to pay for it, but was still unable to obtain the
piece). The hull wouldn't shut properly.
Wednesday, January 11, 2017
Casserole Clasp
I made a casserole carrier for myself several years ago. Love it. It was designed for a 9x13" pan but my 10" springform pan fits great, too. The carrier gets a fair amount of use. I've been using a twist-tie to keep it closed. It's does the trick, but I wanted something a little stronger and a little prettier.
So I made myself a closure from a bit of fabric, a scrap of batting and a snap. It slips through one handle and remains attached to that. To secure the cozy, the end wraps around the other handle and snaps to itself. I have instructions on making the casserole cozy - this post is to go with it.
Wednesday, April 27, 2016
Making QAYG Hexies
I was recently asked how I made my quilt-as-you-go hexies. Each hexagon is a complete mini-quilt, with a top, batting and mock-bound with the backing. Mine are roughly 4" across (finished), but they can be whatever size you want. I use a 4" hexagon for the top and the batting; the backing is a little less than 6". This allows for a skimpy 1/2" binding on the front of each hexagon. I had some leftover flannel when I started this project, so my batting is two layers of flannel. Now that I'm well into my project, I bet one layer of flannel would have worked great, too.
I layer each hexie: backing wrong-side up, then batting, then the top right-side up. The top and batting are centered in the middle of the backing. I made my own templates for these, which aren't perfect. I can see it in the layered photo. But that's okay - it evens out once I get the binding rolled over.
Friday, May 9, 2014
Guinea Pig Cuddle Cups
As with so many of my guinea pig sewing projects, third time is the charm. Pinniped may have approved of the last cuddle cup I made, but I like this one best. Cannoli is pretty happy with it, too.
I usually make cozies and the like from left over material from other projects. Most of my cuddle cups have two to three layers of fleece and no batting. This time around I found a chunk of polyester batting and what a difference it makes! The batting gives the cuddle cup a bit more loft and helps it to keep its shape. From now on, all my cuddle cups will have batting.
Labels:
Fleece
,
Guinea Pigs
,
How-to
,
Projects
,
Sewing
Thursday, May 1, 2014
Guinea Pig Tunnels
I'm wrapping up my backlog of guinea pig sewing projects. The half-written instructions have been nagging me for months. I couldn't post them until I had a good set of photos that matched the instructions. Today's finished project: tunnels.
I experimented with boning-free tunnels earlier this year. My first two attempts had their quirks, but I liked the design. I adjusted the size (and wrote down the measurements!) for this tunnel. It's a little shorter and a bit wider than the tunnel Cannoli modeled in the previous post.
Labels:
Fleece
,
Guinea Pigs
,
How-to
,
Projects
,
Sewing
Wednesday, February 12, 2014
Scrappy Fleece Forest
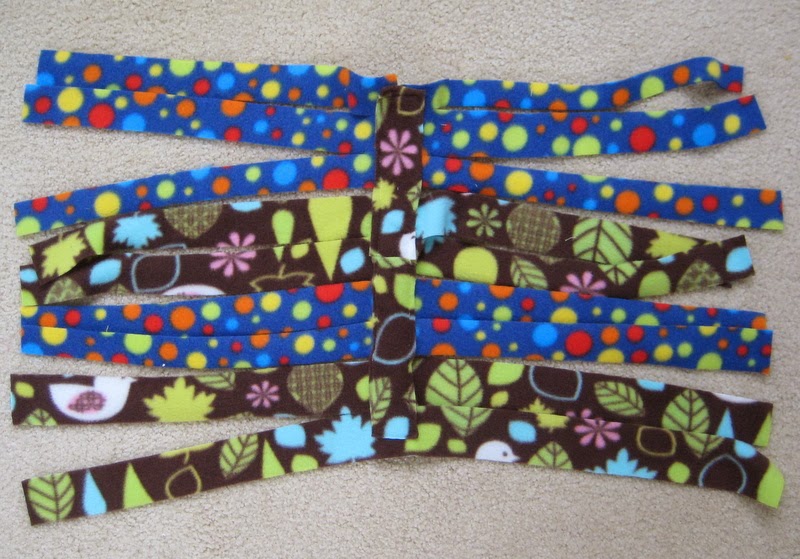
If you're a regular reader, you know I've been on a scrappy kick lately, working through my leftover bits of quilting fabric. I've also been stitching up various chunks of fleece, making tunnels, cozies and a cuddle cup. Those projects left me with some long skinny pieces that didn't seem big enough to make anything... until I was folding the pig laundry last week. I pulled out their fleece forest and was inspired to use the leftover strips of material for some more of these.
The original fleece forest instructions don't require any sewing. However, this version does. The lovely thing about fleece is that the raw cut edges don't fray, so there's no worry about turning under edges or having a wide seam allowance.
Friday, January 3, 2014
Guinea Pig Cozies
Making guinea pig cozies is a fairly simply sewing project. All it takes is a rectangle of fleece, a slightly larger rectangle of cotton fabric and a bit of stitching. Less than 30 minutes of work can result in a happy, warm guinea pig.
My cozies tend to be 12-15 inches square. They can be easily customize them based on the fabric on hand and the size of the guinea pig occupants. This particular cozy was made from a piece of cotton material 12.5x25" and a piece of fleece 11.5x23".
Labels:
Fleece
,
Guinea Pigs
,
How-to
,
Projects
,
Sewing
Wednesday, November 27, 2013
Making a Casserole Carrier
I've worked with this pattern three times. I've made several modifications each time I sew it and not all of the notations made it into the margins of the original instructions. I'm tired of guessing what I did (or worse yet, pulling apart the seams on my carrier to see the layers). I'm documenting it this time around.
I make the carrier out of four layers of material: Inner fabric, Insul-bright, cotton batting and outer fabric. The original instructions say to start with 2/3 yard of each, but I have found that if the cotton or batting shrinks during the pre-wash or if the length of cloth was cut unevenly, it's not enough material to use as instructed. I've also discovered with the extra thickness I make, it needs to be cut slightly wider than the original instructions. I found 3/4 yard each worked well. The carrier also requires two 12" long 3/8" diameter dowels for the handles.
Cut one 41x11" piece of each of the four materials.
Cut one 27x13" piece of each of the four materials.
(Note to self: next time try 41x12" and 27x14")
I make the carrier out of four layers of material: Inner fabric, Insul-bright, cotton batting and outer fabric. The original instructions say to start with 2/3 yard of each, but I have found that if the cotton or batting shrinks during the pre-wash or if the length of cloth was cut unevenly, it's not enough material to use as instructed. I've also discovered with the extra thickness I make, it needs to be cut slightly wider than the original instructions. I found 3/4 yard each worked well. The carrier also requires two 12" long 3/8" diameter dowels for the handles.
Cut one 41x11" piece of each of the four materials.
Cut one 27x13" piece of each of the four materials.
(Note to self: next time try 41x12" and 27x14")
Tuesday, September 4, 2012
Drying Corn Husks
After a number of false starts, I eventually acquired the quantity of corn husks I was hoping for to shred and dry. In past years I would get only what I could store in the fridge for a few weeks (husks last much better than lettuce). But since my girls really like corn husks and I have access to a consistent quantity of organic corn, I wanted to see if preserving them is worthwhile. It's a treat I'm sure they'll appreciate outside of corn season. Besides, I would like to reclaim my veggie drawer.
I left a hamper at the Walpole farmer's market when it opened and picked it up after work. Not as many husks as I had hoped, but much better than my attempt at the CSA the week before. Bringing my own husk container helped out a lot. I plan on returning several more times until they close down in October.
Labels:
Guinea Pigs
,
How-to
,
Piggy Ed
,
Veggies-Fruit
Saturday, July 7, 2012
Medicating Pinniped
![]() |
| DO NOT WANT |
Liquid medication is so much easier to give to a guinea pig than pills. However, you need to be careful. Too much at once can choke a pig if they inhale it or they may spit it out, at which point they haven't gotten the amount of medication they need.
One ml is too much for Pinni to swallow in one go, but she can handle 0.5ml at a time with no problem. I'm not good at giving medication slowly or squirting in just half a syringeful, so I end up drawing the meds twice. The one-two dose approach isn't always easy either, because she knows what's coming when I grab her the second time. It's amazing the strength a little rodent has, especially when it DOES NOT WANT.
Labels:
Guinea Pigs
,
How-to
,
Medical
,
Pinniped
,
Vet
Wednesday, April 11, 2012
Foiling Fleece Bedding Burrowers
| The brick method |
There are a few different ways to deal with this problem.
Labels:
Cage Design
,
Fleece
,
Guinea Pigs
,
How-to
,
Piggy Ed
Saturday, January 28, 2012
Fleece Cleaning Routine
Using fleece as guinea pig bedding, in theory, is dead simple: you buy a few yards of fleece, put it in the cage for several days, take it out, wash it, and put it in again. It's wonderfully economic, it's not dusty nor will it get tracked around the house like shavings or Carefresh. There is a great overview of the stuff on the GuineaPigCages.com forum, called The Fleece Project: The Study. It covers purchasing, preparing and using fleece.
In practice, you'll discover that using fleece is not quite as simplistic as it sounds.
Everyone uses and works with fleece a little differently. Most of my fleece is in upper levels of my cage, so it stays relatively clean. The bottom level fleece is normally covered in wood chips, hay, poo and hair. So even in a single cage, I am faced with different cleaning requirements.
The Fleece Project recommends a Vacuum-Shake-Brush-Beat routine. I prefer a Brush-Brush-Dustbust-Shake routine for cleaning fleece. You probably have (or will have) your own favored routine.
In practice, you'll discover that using fleece is not quite as simplistic as it sounds.
| Tools of the fleece trade: rubber mitt, curry brush, whisk brush and fingernail brush |
The Fleece Project recommends a Vacuum-Shake-Brush-Beat routine. I prefer a Brush-Brush-Dustbust-Shake routine for cleaning fleece. You probably have (or will have) your own favored routine.
Labels:
Cage Design
,
Fleece
,
Guinea Pigs
,
How-to
,
Piggy Ed
Monday, January 2, 2012
Outdoor Pen How-To
These are instructions for building a portable lidded guinea pig pen that could be used indoors or outdoors. Please note: This pen is not intended to be animal proof! It is designed to keep guinea pigs contained and to slow down a passing predator that may see them as an easy meal. When this cage is in use, it should be monitored at all times.
The measurements in these instructions are based on a 14" grid, so if you have grids that are a different size, you will have to adjust the lengths of the PVC pipe. And the instructions assume you are somewhat familiar with cage building as seen on GuineaPigCages.com.
Labels:
Cage Design
,
How-to
,
Outdoors
,
Pig Pens
Tuesday, December 27, 2011
Building A Third Level
Many of my YouTube videos feature Bertie, Pinni and Willow frolicking around in their cage and people want to build a cage like it. These are instructions for the third level I have in my cage.
The design is dependent on having another floor that is only a half-grid
below it. You can get the directions for that in No-Ramp Loft.
The third level in my cage is almost the same size and shape as the second level, just with one extra grid that works as a ramp. Before you build this addition, you need to know that your guinea pigs are not leapers. The third level I designed is rather open, and if my pigs were determined, the could leap out of the cage entirely. It would be a long and possibly fatal drop. If you are unsure about your pigs' penchant for jumping, you may want to replace the half-grids on the balcony with full grids.
Labels:
Cage Design
,
Coroplast
,
Fleece
,
Guinea Pigs
,
How-to
,
Projects
No-Ramp Loft
I've had several people ask for instructions how to build one. It's not complicated, especially if you've made a C&C cage before. The loft is made out of 10 grids, a bit of coroplast and a bunch of 50lb zip ties. If you are adding this onto an existing cage, you will need to modify the base on the side you are adding the level. It requires a half-grid wall instead of the full grids.
I cut a single grid into two pieces (removing the middle row of grid-holes), so that I end up with two 4x9 hole grids. I used a pair of heavy-duty wire cutters for the inner wires, but I needed a hacksaw to get through the thicker edge wire. The two half-grids are the same height as the coroplast on the base. This is to help support the second level on the base of the cage.
Labels:
Cage Design
,
Coroplast
,
Fleece
,
Guinea Pigs
,
How-to
,
Projects
Wednesday, October 5, 2011
Rolling Coroplast
I found a place just down the street that sells coroplast at a decent price (Graphic Images). I had to buy a whole sheet, which is a bit of a drag since I only need at most four square feet. I'm sure I will either use the extra or find someone who needs it.
On Monday, I spoke to the owner and agreed to buy a whole sheet. I told him I'd be by on Tuesday morning on the way to work to pick it up. I'd be putting it in my car. A whole sheet? Impossible. I told him it would fit, that I'd roll it it up. He proceeded to tell me at least three times that I could not roll coroplast. I told him saw how to roll coroplast online. I'd be fine.
So I go in on Tuesday morning to pick it up. I was thrilled that they had a large front office, because it had been raining and I didn't want to attempt to roll it outside. Looked like I could roll it in the office. At which point the secretary tells me, more than once, that I cannot possibly roll coroplast. Sure I can.
I had to help her haul it from the back room, because it's bulky and we put it flat on the floor. I was a bit nervous at that point, because I've never actually rolled coroplast before. I really didn't want to crimp it. But I had read the instructions. How bad could it be?
Pretty easy. The hardest part was getting the packing tape dispenser to work while holding the coroplast in place. I put way more tape on it than was necessary; I was so afraid the thing would spring open before I left the building. I packed it in the car with no problems and headed to work. At home, at the end of the day, I discovered that leaving it rolled up all day resulted in warped coroplast. It has straightened quite a bit in the last day, so it should be in good shape when I cut it.
The secretary was pretty impressed. She said it was too bad that I was in so early, because the owner would have liked to have seen that. It was a good thing I brought my camera! I've emailed him the proof. See? You can roll coroplast!
On Monday, I spoke to the owner and agreed to buy a whole sheet. I told him I'd be by on Tuesday morning on the way to work to pick it up. I'd be putting it in my car. A whole sheet? Impossible. I told him it would fit, that I'd roll it it up. He proceeded to tell me at least three times that I could not roll coroplast. I told him saw how to roll coroplast online. I'd be fine.
So I go in on Tuesday morning to pick it up. I was thrilled that they had a large front office, because it had been raining and I didn't want to attempt to roll it outside. Looked like I could roll it in the office. At which point the secretary tells me, more than once, that I cannot possibly roll coroplast. Sure I can.
Pretty easy. The hardest part was getting the packing tape dispenser to work while holding the coroplast in place. I put way more tape on it than was necessary; I was so afraid the thing would spring open before I left the building. I packed it in the car with no problems and headed to work. At home, at the end of the day, I discovered that leaving it rolled up all day resulted in warped coroplast. It has straightened quite a bit in the last day, so it should be in good shape when I cut it.
The secretary was pretty impressed. She said it was too bad that I was in so early, because the owner would have liked to have seen that. It was a good thing I brought my camera! I've emailed him the proof. See? You can roll coroplast!
Labels:
Cage Design
,
Coroplast
,
Guinea Pigs
,
How-to
,
Piggy Ed
,
Projects
Saturday, August 20, 2011
Guinea Pig Hammocks
I have yards of fleece on hand at the moment, so I decided to make these with fleece on both sides so that they're reversible. The hammocks I've made in the past have cotton fabric on one side and fleece on the other.
Labels:
Guinea Pigs
,
How-to
,
Projects
,
Sewing
Subscribe to:
Posts
(
Atom
)