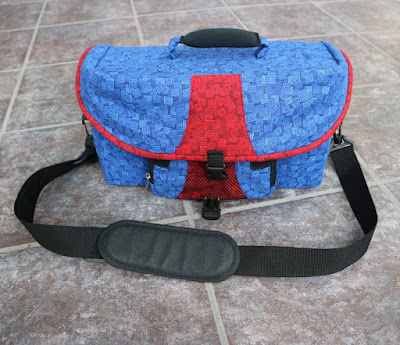
I've said it before, but I really like the fabric he chose.
The dreaded insides. Yeah, so not exactly square or even. I woke up on Monday morning wondering if I should yank them all out and start from scratch. Mostly I worried the fabric would fray from uneven pulling. But when I rolled out of bed and examined my work, it wasn't so bad. So I spent the morning before work stitching the binding around the top edge.
I woke up Tuesday morning thinking of yet another way I could have solved the lining issues. <sigh> Okay, brain. Problem is solved. You don't need to keep coming up with all the better ways I should have done it.
Next time (if I'm ever crazy enough to do something like this again), I will do the insides completely separate from the outsides and slip the whole thing in. In addition, I will treat the foam as if it has no thickness as part of dimension calculations. Would have made my life so much easier!
The front pouch is still my favorite part of the whole carrier. I am amazed I pulled the original apart and recreated it exactly as intended. Which is probably why I'm disappointed that my skill there didn't quite stretch to the whole project.
But - learning experience! There was a bunch of things I did because the little camcorder bag did them, but I didn't think of the ramifications of why it was done that way. The physics of the design made a difference.
Among the things I learned:
- Even though this is a soft-sided bag, heavy interfacing would have been such a great addition. Everywhere. (Even the lid flap needed to be a bit stiffer.)
- The plastic I used to make the sides more rigid just wasn't enough.
- A bag this size is going to take at least two yards of fabric. For goodness sake, buy an extra half yard to boot.
- If there's more than one mark on the fabric, double check you're lining up on the correct center marking before stitching it all together.
- Making sure the side straps were centered was a great thing - if the weight of the bag was also centered (that lovely front pouch causes the whole thing to tilt forward).
- And consider where the stress will be - the bag contorts when it's filled and held by the strap (again, more rigidity in the sides would have helped a lot).
- Good measurements are key - but models would have been way better. Like sewing a dress - this needed fittings along the way. Working in isolation was an extra challenge, but it would have been worthwhile to make 3D cardboard models of the accessories. At which point I'd have started with the insides and made my way to the outside.
Sharing with:
Love Laugh Quilt - Monday Making
My Quilt Infatuation - Needle & Thread Thursday
Confessions of a Fabric Addict - Can I Get a Whoop Whoop?


What a great Auntie you are to make this for your nephew. I'm sure he will be very happy using it. You did a great job.
ReplyDeleteThis is such a complex project. I'm in awe of your even trying it. It came out great. I love the brain continuing to offer suggestions after it's not only done, but delivered. I think a lot of makers probably have that overdrive function.
ReplyDeleteThis is amazing. We are always so tough on ourselves, aren't we? I am glad to hear that I am not the only one with a brain that works overtime at night … You should be very proud of this labor of love!
ReplyDelete