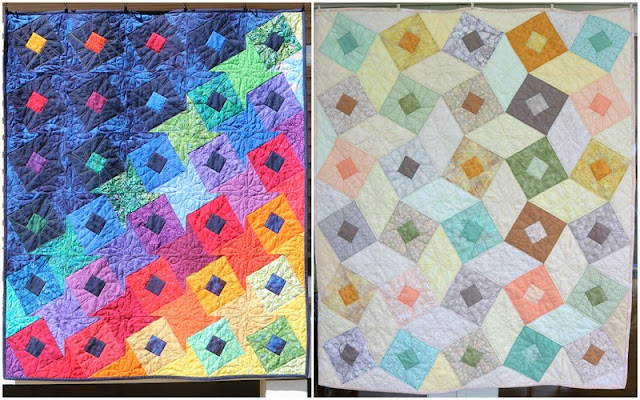
I bought the Creative Grids Kites Plus ruler because I liked its versatility - I could cut triangles and hexagons and kites. I was rather disappointed in the lack of interesting patterns I found online for it. Still, I found the ruler endlessly intriguing. I designed Shattered Kites, then Stained Kites. While working on the latter's backing I hit upon the basic block design used for
Sunrise and
Bouncing Boxes.
A single block creates either the squares-and-pinwheel pattern like Sunrise, or the squares-and-diamond patters like Bouncing Boxes. It depends if you make all the blocks in one direction or mirrored.
Alright - let me take a stab at some basic instructions on what I did.
The 6" kite makes roughly a 7¾" square block (I called it a skimpy 8"). Each block takes 8 half-kites. A strip of 3½" WOF produces 32 half-kites (sometimes 33), a strip from a fat quarter produces 16. Cut block centers at a skimpy 2¾" square.
I liked using solids or batiks for this block because it allows flipping pieces back and forth between the squares or the background. I ended up cutting a lot of extra pieces from printed fabric when I decided the kites should go the other way round.
I put in a piece of ½" tape along the center line of the ruler to help me remember which kite I was using in the project. One edge of the tape lined up exactly where I wanted to put the center line of the kite for trimming, the other edge of the tape I used as a cutting guide (1). This made oversized kites that allowed me to trim them down evenly in a future step - perfect size and a dead-center seam.
Once I cut all my half kites, I arranged them in however I wanted. (I took progress photos to make sure I sewed them all together the right way, too!).

First step is to sew all the half-kites into whole kites. Press seams open (2). I pressed the seams to one side for the first quilt, but found the blocks go together easier and line up better with open seams.
Trim the kites to size (3). I first cut it right-side-up, having lined the center of the kite to the center lines on the ruler.
Flip the kite over, line the clean side against the lines in the ruler, line up the seam on the center line, then trim the other side (4). This should result in clean, centered and even kites (5).
Kites can either be placed circling to the left (6a) or to the right
(6b). If you make all blocks right (or left), you get Sunrise. If
you make the blocks half left and half right, you get Bouncing Boxes.
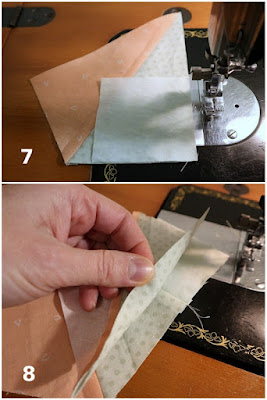
The block is assembled with one partial seam. Line up the square against
the inside half of the kite, right sides together. I have photos sewing a left circling block (7). For those I started on in the middle of the square and stitched the 90-degree angle. Right circling blocks can be started on the edge and stopped after an inch or so. I often flipped them upside-down (so the square was under the kite instead of the square on top of the kite as shown). That's the trickiest bit - the rest kind of runs on its own.
Press open seam, then line up the next kite, matching the 90-degree corner of the kite to the middle square; stitch up that side (8). Press open seam. (This step is the same for either right or left circling kites.)
Repeat for the next two pieces. Then go back and finish the seam on the
first piece.

Press all seams open (9). At this point you have a finished
block. I didn't trim the blocks at this point - the kites should have
been trimmed to size, so this block should be the correct size.
I never quite perfected getting the outside points to be pointy all the time. Some of my squares were a little off-kilter or blunt.
Obviously I'm not a pattern writer! Hopefully this is clear enough to get you started if you want to attempt one of these (and I'll update this if I get feedback). I'd love to see your results if you make one of these.
I've crunched the numbers for the other kite sizes:
- The 8" kite produces a skimpy 11" finished block, using a 4½" WOF and a 3½" center square.
- The 4" kite produces a skimpy 5½" finished block, using 2½" WOF and a 2" center square.
- The 2" kite (if you're brave enough to try it) produces a 2¾" finished block, using a 1½" WOF and a 1¼" center square.
I'm still not done with this ruler. I hit upon another neat design with the Bouncing Boxes backing that reminds me of the little metal jacks I played with as a kid. Getting all the points to align was a big hassle, though. I'm still dreaming... my mind can't let it go.
Sharing with:
Laugh Love Quilt - Monday Making
Wendy's Quilts and More - Peacock Party


Thank you!
ReplyDeleteInstructions I understand, to me, is a miracle!
What a neat ruler. Aah...the problem of perfectly aligning corners. =) Seeing both Bouncing Boxes quilts side by side reminds me how lovely both are.
ReplyDelete